Posts

Showing posts from January, 2022

MDF Project

Image
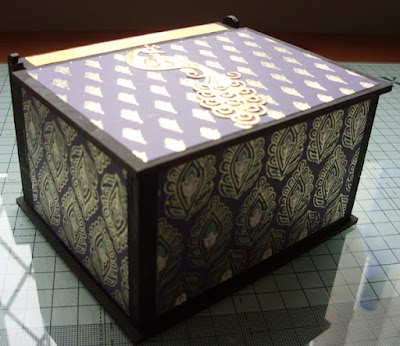
Good morning everyone!  So starts another week, & the last day of January.  Where has this month gone? I have just finished a little MDF project which has taken me quite a few weeks to do.  It wasn't a difficult project but had several stages to it & I cannot sit at my desk for very long, so it was made in several stages. First I gessoed the edges of the pieces in black to make a border around the papers I was going to use.  After doing this I noticed that the brief notes with the project recommended putting the box together first.  Anyway, I kept my fingers crossed that it wouldn't affect my gluing it all together. Next, was to glue the papers to the various areas.  By the way, I changed my mind 3 times on which papers to use, so that used up one of my working sessions. That done I then proceeded to glue it together. It didn't go easily I think the gesso had had an effect on the MDF - but it just took a little gentle persuasion & it went together beautifully. 

Recent card

Image
Good afternoon everyone.   I do hope you are having a good weekend & have lots of good things planned. This afternoon I have another recent card to show you which is the last of January. Its such a shame that I seem to have taken a rather blurry photo. I used a square card & inked through a couple of different stencils to create a soft background to hold the focal image. The floral group is one stamp which I inked in grey ink rather than black  as I didn't want too harsh an image. The card was then layered onto another piece of card which I had inked around the edge with the same background colour, & then layered the 2 onto a square base card. Enjoy your weekend & keep well.

New card design

Image
Good afternoon everyone. I hope that you like me have lovely sunshine today - it is so nice to see the blue sky. Today I have a new design of card to show you, that I made recently.  It was a project in a group I used to attend, but join in with them now online. This the front view with the card closed. This is with the card open. The design is basically a gate fold card with a twist. The 3 panels on the front have been adhered differently.  The top & bottom panels are adhered on their right end to the right hand panel. Then the centre panel is adhered by its left end to the left hand panel. The side panels are z-fold & are decorated as individual panels on the inside. I think that makes sense. I so enjoyed making this card that I immediately made another one because I had an idea for a special birthday card for a friend in a few months time. This one I made in black card with gold embossed layers.  The gold hasn't photographed very well, but the second photo is nearer the

January birthday card

Image
 Hello everyone - how are you all - keeping well I hope & crafting a lot. Today I have another one of the recent January birthday cards I have made; For this card I used a cream DL card.   On a matching piece of cream card I created a background with Brushos.  Over the background I stamped the AALL&Create Iris image along with some of the  text stamps included with the image.  I finished by adding a little colour to the Iris by painting it with watercolour inks in matching shades & doing a scribbled frame around the edge.. I only have a couple of AALL&Create stamps but I do really like this one, the other one is like a poppy head. Thank you once again, for visiting please call again.

A technique revisited

Image
 Hello everyone! Yesterday I created 2 card fronts using an old technique, which I was re-inspired to do thanks to a Natasha Foote video.  (Search for her on YouTube). Natasha produces videos roughly every 2 days & as well as revisiting techniques, she guides us in using the things we already have in our stash in many different ways. I love her videos. This one was using metallic paints on black card.  I only had pearlised paints which I have used a lot in my card making (I bought them years ago for £1 from The Works). I don't think the impact is quite as dramatic but at least it got me crafting. At the moment they are only layered onto complimentary coloured card - not on a base card.  I will do that, plus a sentiment, when I know how I am going to use them. I still have a couple of January birthday cards to show you - but not until they have been received by the persons they are for. Thank you for taking a peek at my little space here on the Internet. Please return again soon

Another January birthday card ....

Image
 .... This time it is the one I made for my Husbands birthday. Coming so close to Christmas & using up a lot of my mojo for those cards, I did struggle to come up with a design for his card.  But he was pleased with what I did & here it is --  I used a 5x5 scalloped edge square card & 2 different stencils.  I also used Distress Inks & applied the colour with blending brushes. The first stencil is the random squares pattern, with an overlay of the music stencil on a square of white card, & rounded the corners.  This card was layered onto a square of blue-green card & then placed on the front of the base card.  The Happy Birthday was part of the stencil - so I had to stamp the With Love to finish the sentiment. I have had both stencils a while & cannot remember what make they are. Thank you for taking a peek at my work I hope you enjoyed your visit. Please call again.

early January birthday cards

Image
 Hello again! It has been quite a few days since I last blogged. The time flies past so quickly & I have had quite a few cards to make this month. Here are the photos of the first 2 cards I made, one for my sister-in-law & the other for a friend. I made use of the same style card for both of them along with identical papers. The embellishments on each were slightly different. The front of the cards were divided into 3 panels & then an acetate strip placed along the bottom edge joining the 2 outer panels together & thereby holding the card together.  The middle panel hangs down in the centre inside the acetate. The third photo gives a clearer view as to how that worked. Card one Card two The embellishment is attached to the acetate strip. I rather like this style & it is a good way of using up DSP you have in your stash, although needless to say would look good with stamped papers. Will certainly use it again. I have some more January cards to show you, but a couple

The first cards for 2022

Image
 Hello! & a Very Happy New Year (belatedly) to anyone who has stopped by to see what I have been up to. I hope you had a good Christmas & raring to go with your crafting in this new year. Before starting on any new card making I had a little bit of a tidy up & sorting through some things just laying around in my craft room I came across a cardboard folder with papers, small stamp & other materials, which must have been free with a magazine.  I do not remember getting it & had forgotten about it anyway. I try & make cards regularly for a friend to help him raise funds for his scout group, so I thought I would use this find for my first cards of 2022. I made six cards in this session & there is enough material for another six cards I feel. A really good start to the year & I hope also to my creative juices. I also have 5 birthdays in January to make cards for. Three have been made, leaving two more to do, but I also have an early February birthday & th