Posts

Showing posts from February, 2022

Different shaped card

Image
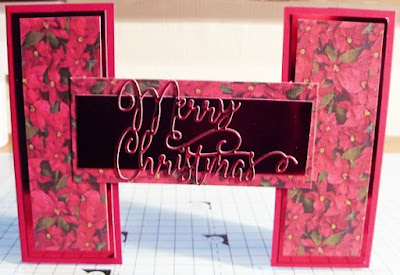
Good morning everyone. Wow! this windy situation is not very nice at all. I  have just got back from collecting my husband from dropping his car off for MOT - really buffeting my little car. Anyway, recently I have shown you 2 rather nice multi-fold cards, one I found through Pinterest the other one a colleague had shown our group how to make it.  Both of those cards were found at Iced-Images. Yesterday I attempted another one of their cards -- I should have taken an aerial view because you cannot tell from this photo that it is in fact U-shaped, & there is no back to it. The card panels are cut to size then folded down the centre. One half is the front & the other half the side.  The topper is then placed between the 2 sections attaching to them by a small overlay. This is the only thing keeping the card together. The nice thing is it can be made in different sizes once you have the finished size in mind.  Iced-Images showed 3 ways - A5 landscape (the one in my photo); A5 port

blog challenge - sketch

Image
Good afternoon everyone. I hope you survived yesterdays storm Eunice without too much stress & damage. The card I have today is another sketch challenge, this time from the Tuesday Morning Sketches blog. I enjoy creating from sketches as the design has been thought out for me, which leaves me the time to decide how & with what to decorate the card. I always find them very helpful when my mojo is a little bit lacking. Here is the sketch; TMS 644 and here is my card The background paper & the focal image are all from Hunkydory & the sentiment  is a Julie Hickey design. I have had these sheets for some time & the sketch challenges are giving me the opportunity to use them. I have decided this little card will now go to a friend who is having sight problems & doesn't think she will be able to do much card making because of it.  She is also part of a stamping group I am with & has decided to leave us due to this. She will be sadly missed. Thank you for dropp

Blog challenge - sketch

Image
 Good afternoon everyone. I do hope, if you are all wrapped up warm & in a safe place on this awful wet & very windy day. The card I have for you today is from the challenge over at Freshly made Sketches  & here is the sketch we had to follow; and here is my card; I decided on a coloured card this time which I put together from 2 squares. The closed edge has what I believe is called a book spine. The two pieces of card are glued together for about 3/4", which I then punched 2 holes in & threaded ribbon through for a type of faux bow. The overall size is about 5" x 5.75", so the area to decorate is a 5" x 5" square. This was a really nice sketch & I think I may use it for Christmas cards - after all its never too early to start is it? Thank you for stopping by - please all again.

Another multi fold card

Image
 Hi everyone I hope you are all crafting busily & making wonderful things. Today, as promised, I have another multi fold card to show you.  This one I found when taking a long lovely search through Pinterest. Isn't it a great shape? The most important thing about making this one was to get a sharp point where all those diagonal lines come together at centre front.  It is free standing, but did take a little persuasion to stand up. as long as the sides are at the angle as here its fine.  I am currently wondering if I can devise something at the back to stop it falling back. I did thinking if I made another base & glued them together down the left-hand side that would work, - but it doesn't - so thinking cap back on. Thank you for stopping by I hope you enjoyed your visit.

Different fold card

Image
Good afternoon I hope everyone is well. The card I have to show you today I first saw made by a crafting colleague. The only thing she gave was a diagram for the cutting & folding & overall size. I love sculptural cards & this is definitely one of those. Although the shape looks daunting this wasn't so difficult to do. The important thing was for the base card not to be too thick, otherwise the points at the folds were more difficult to get sharp.  It's free standing & folds flat for posting.  Possibly a belly band might be quite good for holding it flat in the envelope. A few days after making this one I found 2 more cards with lots of folds in. I have finished one & will blog it tomorrow, the second one I have yet to do. Happy crafting everyone. 

recent card

Image
Good afternoon everyone to a very grey day here in the UK. It is quite cold too. The card I have to show you today is inspired from watching a video by Natasha Foote from New Zealand. I check her videos regularly & she has some great ideas.  She also takes the mystery out of of some techniques which is quite inspiring. Here is a link to her YouTube channel - just click on her name - Natasha Foote. Here is the card I made following her video - using paper strips as a background & for a focal image as well. The stamp I used was one by Honey Doo Crafts I cut the strips of paper to .5" which was narrower than Natasha cut hers & chose some spring time colours.  I then used double sided sticky paper on a piece of white card & laid down the strips, this was repeated for a second piece of card the same size. The Focal image & sentiment I stamped in Versamark Ink & then heat embossed with white embossing powder. The stamped image was then cut around & placed on

Blog challenge - Happy Birthday

Image
Good afternoon everyone, I do hope you all had an enjoyable weekend. My card today is one I have made for a blog challenge & it is with the  "Less is More"  blog. LIM is celebrating their 11th birthday so the challenge is Here is my card -  I have stamped with Versamark Ink & embossed with silver embossing powder.  Sadly the little frame seems to be more grey in colour - I think due to the slightly heavier edge & solid flowers to the design.  The Happy Birthday is much more silvery. I decided to add just a little colour to the butterfly, just to lift the design slightly from all the silver. The stamps are from an anonymous source, possibly free gifts on magazines, which I have had for a while & this is the first time I have used them.  I like how they stamp & they will be used again. Thank you for stopping by & why not pop over to "Less is More" & take a look at what everyone is creating or better still join in the challenge.

Recent card

Image
 Good afternoon, Happy Sunday! Today I have a fairly recently made birthday card to show you. I say fairly recently because it was made back in the early weeks of January, due to the fact it was to go out to the States. The card was for our daughter whose birthday was this week, & she lives in Missouri. We had a message from her to say it had arrived the day before her birthday. So just as well we sent it early, only took 4 weeks! Here is the card that I made -  It is called a 4-panel card. I stole the idea from a video by a lady called Natasha Foote who lives in New Zealand & has a great series of YouTube videos. Here is a link to her channel --  Natasha Foote . I used 4 A5 pieces of card & embossed them with 4 different embossing folders. They were then cut into different sizes.  Next I used a fine grit sandpaper block to lift the colour off of the embossed images, giving the white pattern. Each piece was then layered onto silver mirri card & then adhered to the card

Sketch challenge

Image
 Hello again - I am back with my second challenge for today. Based on the closing dates for these sketches I should have blogged this one first - but never mind I am still in time. This challenge comes from Tuesday Morning Sketches   #643 & here is the sketch; & here is my card It hasn't got a sentiment / greeting, because I will put that on there when I know what I will be using it for. The patterned paper & focal image are from Hunkdory, which I have had for some time & just getting around to using them again. I thought this one suited the design plus some blue card. The focal image I have placed on sticky pads to lift it a little. I had to trim down the backing paper & find I have 2 panels left that will make 2 very nice clean & simple cards. I think that will be my project tomorrow. Why not pop over to Tuesday morning sketches & see what other crafters have made from this sketch, even better, have a go yourself!

Sketch challenge

Image
Hi everyone - happy weekend. The challenge this time has been set by Freshly Made Sketches  & it is their sketch #522 by Kim. FMS also like their challenge results to be in the CAS style.   In case anyone is not aware what CAS means - it is - Clean & Simple. Here is the sketch and here is my card I used some white hammered card & rounded the outer corners to soften the look. The focal image is on a square of white card that I have lightly coloured with a pale blue ink, which is also coloured the circle card for the greeting. The strip behind the focal image was also plain white & coloured this time with the next darkest blue ink. The flowers on the topper were coloured in green & blue shades to keep the colour scheme fresh. What not pop over to the blog & see what others have done with this sketch.  In fact, why not take part yourself.  I off now back into my craft room to create another blog challenge.  So, see you back here again soon.

Blog challenge times two

Image
Hi everyone.  Today I decided to enter another blog challenge - which I haven't done for a little while. Whilst looking to see which one I would try I noticed that I could probably do two with one design. It meant pretending something wasn't what you would think it was but I thought I would give it a try.  Nothing ventured, nothing gained as they say. The two blogs are Perfectly CAS and Addicted to CAS The challenge at Perfectly CAS was a card with Flowers, & the challenge at Addicted to CAS was a card with Hearts. The thought that came into my mind was that flower petals can be heart shaped - so there it was - my idea for these challenges. Here is the card; Each flower is made from 5 small hearts cut from pale pink paper. I added extra shading with some pink ink that was a little darker, plus I over-stamped the completed flowers with a "dotty" stamp for texture. The leaves were the same heart die, shaded with a slightly darker green ink.  The Happy Birthday is a

Congratulations to Her Majesty Queen Elizabeth II

Image
  Your Majesty may I wish you many congratulations on the occasion of your Platinum Jubilee

Play time

Image
Hello everyone!  How are you all? Inspired by a challenge at a stamping club I am in where the challenge card was to do with dies I had an idea to have some fun with mine. I had several times seen videos & articles about using dies as stamps etc.  So yesterday was the day to try these out. It took me a while to decide which die to work with - I wanted something interesting. In the end the one I chose was perhaps a little too intricate.  It cut  card reasonably well, took several passes but was very pretty. So I made a card to see how it would look. It is lacking a greeting, which I will put on it when I know what I am using it for. As you can see it is quite a fragile design & all those little pieces were quite tricky to remove. Now to experiment! I decided to die-cut fun foam to make a stamp. It worked well actually, but took ages to remove the bits.  I lightly used some stencil glue on the back in order to put it on an acrylic block to use it.  Before testing it I thought I w